Improve your e-shop
with one of the plugins
Plugins
Choose one of the
responsive templates
Templates
Extensions


Top plugins


Price
Save up to $180 per month
with the PROFI package
20 optional add-ons, 10 currencies, 10 localizations and other benefits...
for only $22 per month
View packages
Invoice
$ 4.00 / month 100 Credits / month 1 day FREE trial
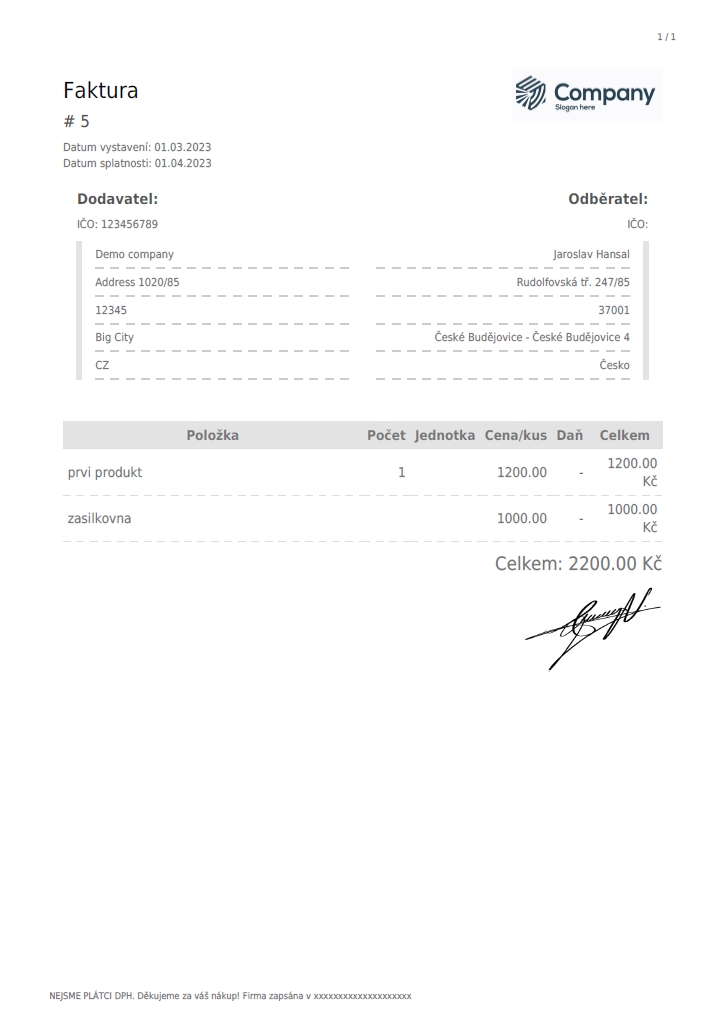
A simple system for creating invoices directly in your administration. If you don't want to use any invoicing system, this option is the obvious choice for you. Thanks to this plugin you can issue invoices on your e-shop for your orders. The advantage is that you do not have to set up any additional invoicing system. This simple invoice generator created by us will suffice.
What do you get by installing the Invoice add-on?
A simple invoice generator
Possibility to fully configure the form and texts of the invoice (invoice data, logo, signature)
Option to set up automatic invoice generation to the order confirmation email
How it will work with your eshop
By using the Invoice module, you will be able to generate a tax document for your customer immediately after order delivery. You can do this manually for any delivered order. The invoice number will be the same as the order number. The actual initial setup of this add-on will be done after installation in the "Add-ons" section - here you can find the installed add-on under the name "Invoice" and click on the "Settings" link to perform its basic setup - inserting your logo, signature, your invoicing data. Also, here you have the option to activate the connection of the invoice to the email after each order is made by the customer.
Issued invoices are optimized for VAT payers and non-payers.
Installation procedure
- On this page, click on "Install" (if you have more than one e-shop, choose which one you want to install the add-on in)
- Then you will see the "Invoice" option in the "Add-ons" section of the e-shop administration.
- Click on "Settings" and here you can define "Invoice settings", "Company details" and "Localization".
- You fill in the details (e.g. inserting your logo, signature, due date, your billing details) + you have the option to activate the invoice attachment to the email after each order is made by the customer to be displayed on the invoice and save the changes.

Simple Warehouse
$ 4.00 / month 100 Credits / month 1 day FREE trial
The "Product in stock" add-on allows you to distinguish the stock of each product. With one click you can mark a product whether it is in stock or not. In addition, you can define individual stock statuses to make them as clear as possible for your customers and to encourage them to buy. You can also disable or allow products that are out of stock to be sold.
What do you get by installing the "Product in stock" add-on?
- The ability to mark products as in stock and out of stock
- Quickly mark stock in one click
- Definition of custom text labels for both stock levels
- Enable or disable selling orders with products that are out of stock
Installation and activation procedure:
- On this page, click on "Installation". You will find the box on the right hand side.
- Install the free add-on
- After installing the add-on, look for the "Simple Warehouse" add-on in the "Add-ons" section of the administration and click on the "Settings" link.
- In the following form you can set custom labels for both types of stock availability.
- By checking the "Product can be purchased when it's out of stock" option, you will allow shoppers to also order a product that is out of stock. However, in this case, remember to keep shoppers informed and up-to-date with the current delivery situation of the selected product.
- Switching the stock availability of individual products is done by simply clicking on the green or red icon next to the selected product in the administration.

Warehouse
$ 4.00 / month 100 Credits / month 1 day FREE trial
This add-on allows you to keep numerical inventory of individual products. These stocks will be automatically deducted when you send the order.
What do you get by installing the "Stock" add-on?
- Always up-to-date stock status for each product
- Clear and always perfect information for shoppers about whether a product is in stock and can expect it to be delivered as soon as possible
- In case of purchasing more than the current stock of a product, you can disable ordering it above the current limit
How it will work with your e-shop
By using the "Stock" module, visitors to your online store will always see the current stock availability of the product they are viewing, with the option to view the exact number of units available. Simply set the initial number of available units for the product (in the "Stock" tab). It is possible to define alert messages for attempting to order more pieces of products, in case the ordered quantity exceeds the stock or messages where the product is already completely sold out. It also allows you to completely hide products in the store if they are sold out.
Cannot be used at the same time as the "Product in stock" add-on. You can only use one add-on at a time. The "Stock" add-on is an extended version of the simple "Stock" add-on.
Installation procedure
- On this page, click on "Install" (if you have more than one e-shop, choose which one you want to install the add-on in)
- You will then see the "Warehouse" option in the "Add-ons" section of the e-shop administration.
- Click on "Settings" and here you can define "General settings", "Stock labels" and "Shopping cart".This add-on allows you to keep numerical stock of individual products.
- These stocks will be automatically deducted in case of order clearance.
In case you decide not to use the add-on anymore, please inform us at support@flexumshop.com and we will delete it from your e-shop.

Heureka
$ 4.00 / month 100 Credits / month 1 day FREE trial
Get your e-shop on the biggest comparison shopping site. You manually register to each product search engine, in our case Heureka.cz, using their website.
Heureka is a large comparison, search engine and catalogue of goods. To be able to transfer your goods to their environment and for the goods to be offered, you need to have the products in an XML file. You can include all the goods you offer in your e-shop. This add-on will help you to create just the structure that Heureka requires. If you were to create this file manually it would be too tedious, plus just updating this feed
e.g. adding new products to the XML feed would take more and more time.
What do you get by installing the "HEUREKA.cz" add-on?
- simple generation of an XML feed with your products
- easier update of the feed in case of adding/removing a product from the offer
- reach a larger audience of potential customers
- service "Verified by customers"
Installation procedure:
- On this page, click on "Install" (if you have more than one e-shop, choose which one you want to install the add-on in)
- You will then see the "Heureka" option in the "Add-ons" section of the e-shop administration.
- You will create a Heureka in the administration below and click Plugin - Flexumshop (plugins-flexumshop.com). Here you will see the XML feed address for Heureka.
- You can configure in the product details in the Heureka tab - product name and description. Further in the Product Categories section - Heureka category. Here in the box there is a category whisperer and when you start typing you will see a bar of categories that Heureka offers. If the category is too general it will not appear. For a list of Heureka categories, see https://www.heureka.cz/direct/xml-export/shops/heureka-sekce.xml.

Packeta
$ 4.00 / month 100 Credits / month 1 day FREE trial
The couriers of Zásilkovna will pick up your packages, then deliver them to their destination. As comfortably as possible. You can ship to drop-off points, to the increasingly popular Z-Boxes or directly to the address specified by the customer. And all this at reasonable prices. The shipping company already provides comprehensive logistics services for online shops in 30 countries. The delivery company is a member of the global Packeta group.
What do you get by installing the Shipper add-on?
- Shipping to the point of delivery from 54 CZK
- Shipping to an address from 79 CZK
- Fast shipment submission directly from the e-shop administration
- 9000 dispatch and delivery points in the Czech Republic, 3000 in Slovakia
- 5800 self-service Z-Boxes, operated from the mobile app
- Easy-to-use administrative system for shipment management
- Possibility of evening delivery in Prague, Ostrava and Olomouc
- Delivery to 30 countries in Europe and America
- Interactive widget installed in the e-shop cart with a search engine for the nearest available delivery points
How it will work with your e-shop
Z-BOX
By installing it, the Shipping module will be automatically inserted in the administration among the available shipping methods. After activating the widget (see Installation procedure below), the shopper will choose the Shipping as the shipping method. In the next step of the ordering process, the customer will see a widget with a map and a search engine of the nearest available delivery points. The map shows both the dispensing points and the Z-Boxes. In addition, the outlets can be filtered according to personal preferences - for example, by opening hours or only locations where it is possible to pay by bank card can be displayed. The buyer has 2 days to pick up the package at the Z-BOX and the Zásilkovna informs about the location of the package by SMS and e-mail. The parcel can be picked up using the delivered password, which is used to identify the owner of the parcel.
And it will be even easier for you, the e-shopper, to use Parcel Shop. Simply send the order you want to send to the customer using a courier simply by two clicks into the system and then just wait for the courier to pick it up. Perfect, right?
Installation procedure
- On this page, click "Install". The box can be found on the right hand side.
- Install the add-on
- Go to the "Add-ons" section in the administration and look for the "Packeta" add-on
- Enter the Client ID and Client Secret that you get from the Shipping Company (Packets).
- Then save the changes.
- Go to Shipping and Payment - Shipping Method and here "Packet" is created as a shipping method and you need to set it up. Click on the pencil icon and make the settings according to the screens below.

GDPR
$ 4.00 / month 100 Credits / month 1 day FREE trial
When running an e-shop, you can certainly avoid collecting personal data of your customers. The General Data Protection Regulation (GDPR) requires data processors to take measures against risks. The most common risks are loss, data leakage, theft and other technology failures that can occur. For e-shop administrators, this add-on is a must-have and we recommend everyone to download it.
Installation procedure
- On this page, click on "Install" (if you have more than one e-shop, choose which one you want to install the add-on in)
- You will then see the option "GDPR" in the administration of the e-shop in the section under the name "ADD-ONS".
- Click on "Settings" and here you will be redirected to "https://gdpr.plugins-flexumshop.com/database" and here you will go to the "Settings" section and make the settings according to what you use on your e-shop.

URL optimization
$ 4.00 / month 100 Credits / month 1 day FREE trial
URL´s tell us the location of a page or document for visitors and search engines. Wisely chosen URLs are an advantage for SEO. There are a few guidelines that URLs should and do have and this plugin will help you with that. By installing the add-on, search engines will know if it is a product, product category, article, etc.
What do you get by installing the "URL Optimization" add-on?
- Make it easier for search engines to find products, articles, product categories
Installation procedure
- On this page, click on "Install" (if you have more than one e-shop, choose which one you want to install the add-on in)
- Then you will see the option "URL optimization" in the "Add-ons" section of the e-shop administration.
- You click on "Settings" and here you can define "Product", "Product category", "Article", "Article category" and "Product group".
Facebook pixel
$ 4.00 / month 100 Credits / month 1 day FREE trial
Facebook Pixel is a measurement code that you implement in your e-shop. It sends data about traffic and completed conversions, order value and other information on your website to Facebook Ads (Facebook's ad manager).
How does it work?
When a customer comes to your e-shop, Facebook Pixel places cookies and data about what the user is doing on the site into their browser. This means that it collects the necessary data about the user and also about the movement they go through on the e-shop.
Since it collects data you need to inform your customers about the use of the Pixel as well as your customers in terms of GDPR. In case you want to use paid advertising on Facebook it is a must to have this add-on activated.
What do you get by installing the "Facebook Pixel" add-on?
- Information about the movement on the e-shop, which is sent to Facebook
- data collection to Facebook
- after evaluating the data in Facebook, you can target Facebook advertising better
Installation procedure
- On this page, click on "Install" (if you have more than one e-shop, choose which one you want to install the add-on in)
- You will then see the "Facebook pixel" option in the "Add-ons" section of the e-shop administration.
- Click on "Settings" and here you can enter .
"AddToCart" Event = Adding an item to your shopping cart. For example, clicking the Add to Cart button on the site.
"Purchase" Event = Completion of a purchase, usually marked by receiving an order or purchase confirmation or receipt for the transaction. Perhaps displaying a page thanking you for a purchase or confirming a purchase.
"View Content" Event = Visiting a page that interests you. This might be a product page or landing page. You can tell if someone has visited the URL of the site by the content view, but not what they are doing or displaying on the site.

Sitemap
$ 4.00 / month 100 Credits / month 1 day FREE trial
Do you know how to achieve a better position in search engine results? It can be done with several SEO tools. But if robots have trouble finding your site, basic SEO tools won't be enough. In this case, you need to look for a solution in the sitemap.xml file. Sitemap is a sitemap i.e. a file that is supposed to help internet search engines to get to know your e-shop.
What do you need?
your domain name in the e-shop administration
a domain pointed to us
What do you get by installing the "Sitemap" add-on?
The ability to generate a sitemap for your e-shop
It will help search engines to crawl pages that would be hard to find
One of the tools to help you rank higher in search
Installation procedure
- On this page, click on "Install" (if you have more than one e-shop, choose which one you want to install the add-on in)
- You will then see the "Sitemap" option in the "Add-ons" section of the e-shop administration.
- After entering your domain with "/sitemap.xml" e.g. www.mojedomena.cz/sitemap.xml, your e-shop sitemap will be displayed.

Pohoda
$ 4.00 / month 100 Credits / month 1 day FREE trial
Pohoda is software that helps with accounting and tax records. If you have this accounting system, you can connect it to the e-shop on Flexumshop. Just download this add-on.
What do you get by installing the Pohoda add-on?
- Easier connection with Pohoda
- Communication with Pohoda will be faster than manually transferring data
- Once you have this add-on, you can enter information such as the warehouse code and registration number you have in the Pohoda system and then export orders to the accounting software.
- For those who use Pohoda, we offer you an easier way to transfer orders and it will save you a lot of time.
Installation procedure
- On this page, click on "Install" (if you have more than one e-shop, choose which one you want to install the add-on in)
- You will then see the option "Accounting Wellbeing" in the left column in the administration of your e-shop in the "ADD-ONS" section.
- Click on the "Accounting Wellbeing" option see the screen below.
- Fill in the details of the store code and company registration number and save the changes.
- You can then generate an XML feed for Pohoda with the orders, where you specify from what date and by what date the information should be generated and click on "EXPORT" and the export will be done.
- The XML feed address will be generated e.g. pohoda_orders_12ab34cd5e678_1111111.xml. You download it and insert it into the Pohoda accounting system.Exporting data to Pohoda accounting software

Cookie notice
$ 4.00 / month 100 Credits / month 1 day FREE trial
Cookies are files created by the e-shop and stored on your computer via browsers (Google Chrome, Mozilla Firefox, etc.).
The cookie bar is an element that should appear to the customer when they first visit the site.
The customer would see a bar with consent or disagreement to the processing of your customer's data.
You can provide several types of cookies (functional, analytical, marketing, personalization) and choose which to allow or reject.
We definitely recommend having this feature downloaded.
Installation procedure
- On this page, click on "Install" (if you have more than one e-shop, choose which one you want to install the add-on in)
- You will then see the "Cookie notice" option in the "Add-ons" section of the e-shop administration.
- Click on "Settings" and here you can define everything you need.

Template editor
$ 4.00 / month 100 Credits / month 1 day FREE trial
On this page, click on "Install" (if you have more than one e-shop, you can choose which one you want to install the add-on in)
Then you will see the option "Template editor" in the left column in the administration
Here you can download the template, edit it to your liking and upload it back and edit the colors in the template.In case you don't like the existing template or want to change it, this add-on allows you to change the selected template.
Now the system offers 11 graphic templates and we will certainly not stop there in the future.
But why not customize your template exactly to your liking? Let's do it. Download the add-on and edit.
What do you get by installing the add-on?
- By installing this add-on, you enable editing, uploading and downloading graphic templates in your system.
- You can download and edit the selected template using HTML, CSS, JS
Installation
- On this page, click on "Install" (if you have more than one e-shop, you can choose which one you want to install the add-on in)
- Then you will see the option "Template editor" in the left column in the administration
- Here you can download the template, edit it to your liking and upload it back and edit the colors in the template.

Seo
$ 4.00 / month 100 Credits / month 1 day FREE trial
In case you want to optimize your e-shop for search engines such as Google, Seznam and others, this add-on is the right one for you.
The add-on is designed to improve the searchability of your e-shop.
Search engines send out so-called bots. When this robot enters your site, it collects data from it and processes it.
What elements are important to set up for better tracking?
Title for the e-shop, description, product name, categoerie and meta tags. With this add-on you can set the title for the e-shop, the description (recommended up to 160 characters) and the meta tags in the administration after installing the add-on.
We recommend that the title should be around 50-60 characters. You can define the meta tag by entering your own information about your e-shop, which will then be generated in the site code, so search engines can find you better.
What do you get by installing the "SEO" add-on?
- Read product information
- Read and edit custom URLs
- Read article content
- Search engine optimization
Installation
- On this page, click on "Install" (if you have more than one e-shop, choose which one you want to install the add-on in)
- You will then see the "Seo" option in the "Add-ons" section of the e-shop administration. Here you can enter "Meta tags" and "Basics Details" = "Title", "Description" ( main title and description for the e-shop)
- Then you can also enter Seo in product details (Products - edit specific product), product categories (Product Categories - edit specific category) in "Seo" tab

Google feed
$ 4.00 / month 100 Credits / month 1 day FREE trial
If you want to offer your products through Google Shopping, this add-on is an integral part of fully connecting them.
How to connect?
- You will need to create a Google Ads account.
- Once you have this account you will proceed to register for the Mechant Center.
- Don't forget to link the two accounts.
For instructions on how to do this, please see : https://support.google.com/merchants/answer/9455541?hl=en&ref_topic=7294470.
One of the last steps is to verify your online store. - Again, see the instructions ->https://support.google.com/merchants/answer/176793?hl=en for more information.
- You can insert this generated key into the installed SEO add-on (free add-on installation -> https://marketplace.flexumshop.com/en/plugin/seo) in the Meta tag folder in the e-shop administration in the Add-ons - Seo tab and then perform verification. Once the verification is done you can insert the XML feed.
- On this page, click on "Install" (if you have more than one e-shop, choose which one you want to install the add-on in)
- In the e-shop administration in the left column at the very bottom you will see a new tab "Export Google" you can then generate an XML feed for Google purchases. Make settings in the "Export", "Import", "General", "Category" tabs.
- You will insert this feed directly into the Google Shopping administration.
- SUCCESS - Google purchases will offer your products/goods.

PayPal
$ 4.00 / month 100 Credits / month 1 day FREE trial
The PayPal add-on offers a simple connection of your e-shop with the PayPal payment service without unnecessary worries, such as programming or complicated payment gateway setup. You can use the PayPal gateway just by entering the provided data that PayPal sends you.
What do you get by installing the "PayPal" add-on?
- Fully functional connection to the payment gateway
- A payment method for your customers through which they can pay for products/services in your e-shop
- PayPal is one of the most secure payment solutions, because the payer does not have to provide any sensitive card information
- You, as the seller, can check the payment made by the customer almost immediately after the payment is made (within a few seconds the payment information is printed)
- The advantage of this payment method is that you can have, for example, CZK as the main currency and in case the money arrives in another currency, it will be converted according to the current exchange rate
Setting up a PayPal account
- You go to the website : https://www.paypal.com
- You choose what type of account you want to open - personal, business
- Enter your email to register your account and fill in your contact and personal details and tick the agree to terms and conditions.
- Information about the account holder, frequency of payments and more must not be missing.
- The system will then send you a verification email. Go to your email, track down the email from PayPal and verify your email.
- Once reconciled, PayPal will ask you for your password. After entering it, log in and this should verify your account just fine.
- On this page, click on "Install" (if you have multiple e-stores, choose which one you want to install the add-on to)
- You will then see the option "PAYPAL" in the "Add-ons" section of the e-shop administration.
- Click on the "Settings" option and here you enter the data that PayPal has provided you with ("Client ID", "Client secret") click on "Production mode" and then save the changes.
- Then you go to Shipping and Payment - Payment Methods and find PayPal and set it up.

GTM
$ 4.00 / month 100 Credits / month 1 day FREE trial
For this principle to work you need to place the GTM code in your e-shop administration.
This add-on is designed to insert additional codes and makes it easier to work with codes.
How to set up GTM:
- In case you want to set up GTM you need to have a Google account.
- With it, you log into the GTM interface and create an account there, where you fill in: account name, country, store URL and the target form "Web".
- After agreeing to the terms and conditions, you will see a code that you will insert into this add-on if you download it.
- On this page, click on "Install" (if you have more than one e-shop, you can choose which one you want to install the add-on in)
- You will then see the "GTM" option in the "Add-ons" section of the e-shop administration.
- Click on the "Settings" option to insert the part GTM- ...... and activate the "View item event" field and save the changes.

Google Analytics
$ 4.00 / month 100 Credits / month 1 day FREE trial
These are detailed statistics from Google. So if you want to track how your customer behaves, we recommend having this add-on.Have no idea how to use Google Analytics 4 and you're scared? We'll be happy to get rid of it for you.
The first requirement is to have a Google account. A Gmail account is sufficient. Once you have this account created, you go to: https://analytics.google.com/analytics/web/provision/#/provision
The next steps are described below:
- Fill in the name of the account (required) We recommend that you provide a clear name so that you can recognize it at a glance.
- Choose what information you want to give Google about your account.
- Enter the name of the website e.g. www.mojedomena.cz or htttps://mojedomena.cz or mujeshop - GA4
- Fill in the time zone and currency of the e-shop.
- In the last step you will need to fill in information about your business - industry, size of business and how you plan to use Google Analytics. Then click "Create" and don't forget to confirm the terms and conditions and your account will be created.
In order to get a code that you can paste into your administration you need to set up a measurement stream.
- Select the option for which you are creating the code. You are using an e-shop, so choose the "Web" option.
- Fill in the URL field of the website e.g. www.mujeshop.cz and the actual name of the stream.
- Use a name in the stream name that allows you to identify it unambiguously.
- Once the stream has been created, a confirmation screen will appear.
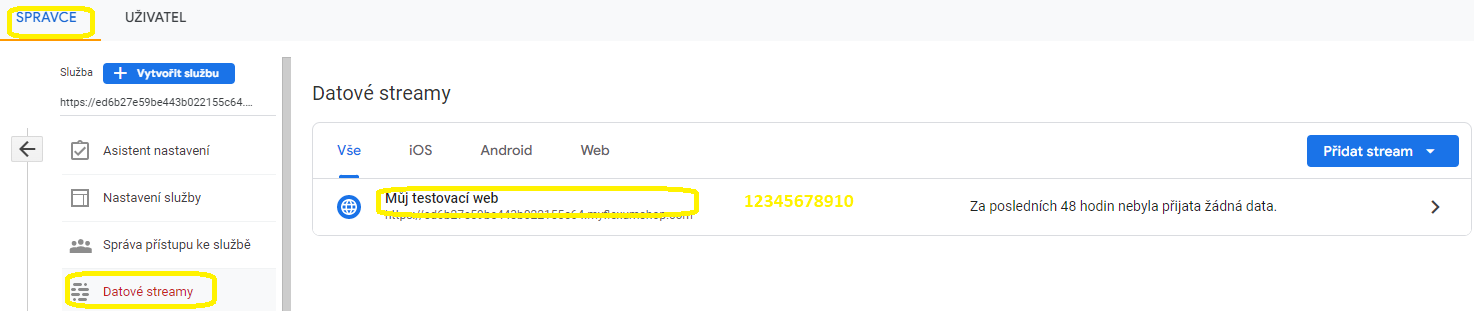
- You can find the code in the Manager - Data Streams section and click on the name of the created GA. You will see the name of the stream, the stream URL, and the stream ID and measurement ID. The code "G-......." will be displayed in the measurement ID and you can copy it (see screenshots).
- Go to the e-shop administration to complete the linking.

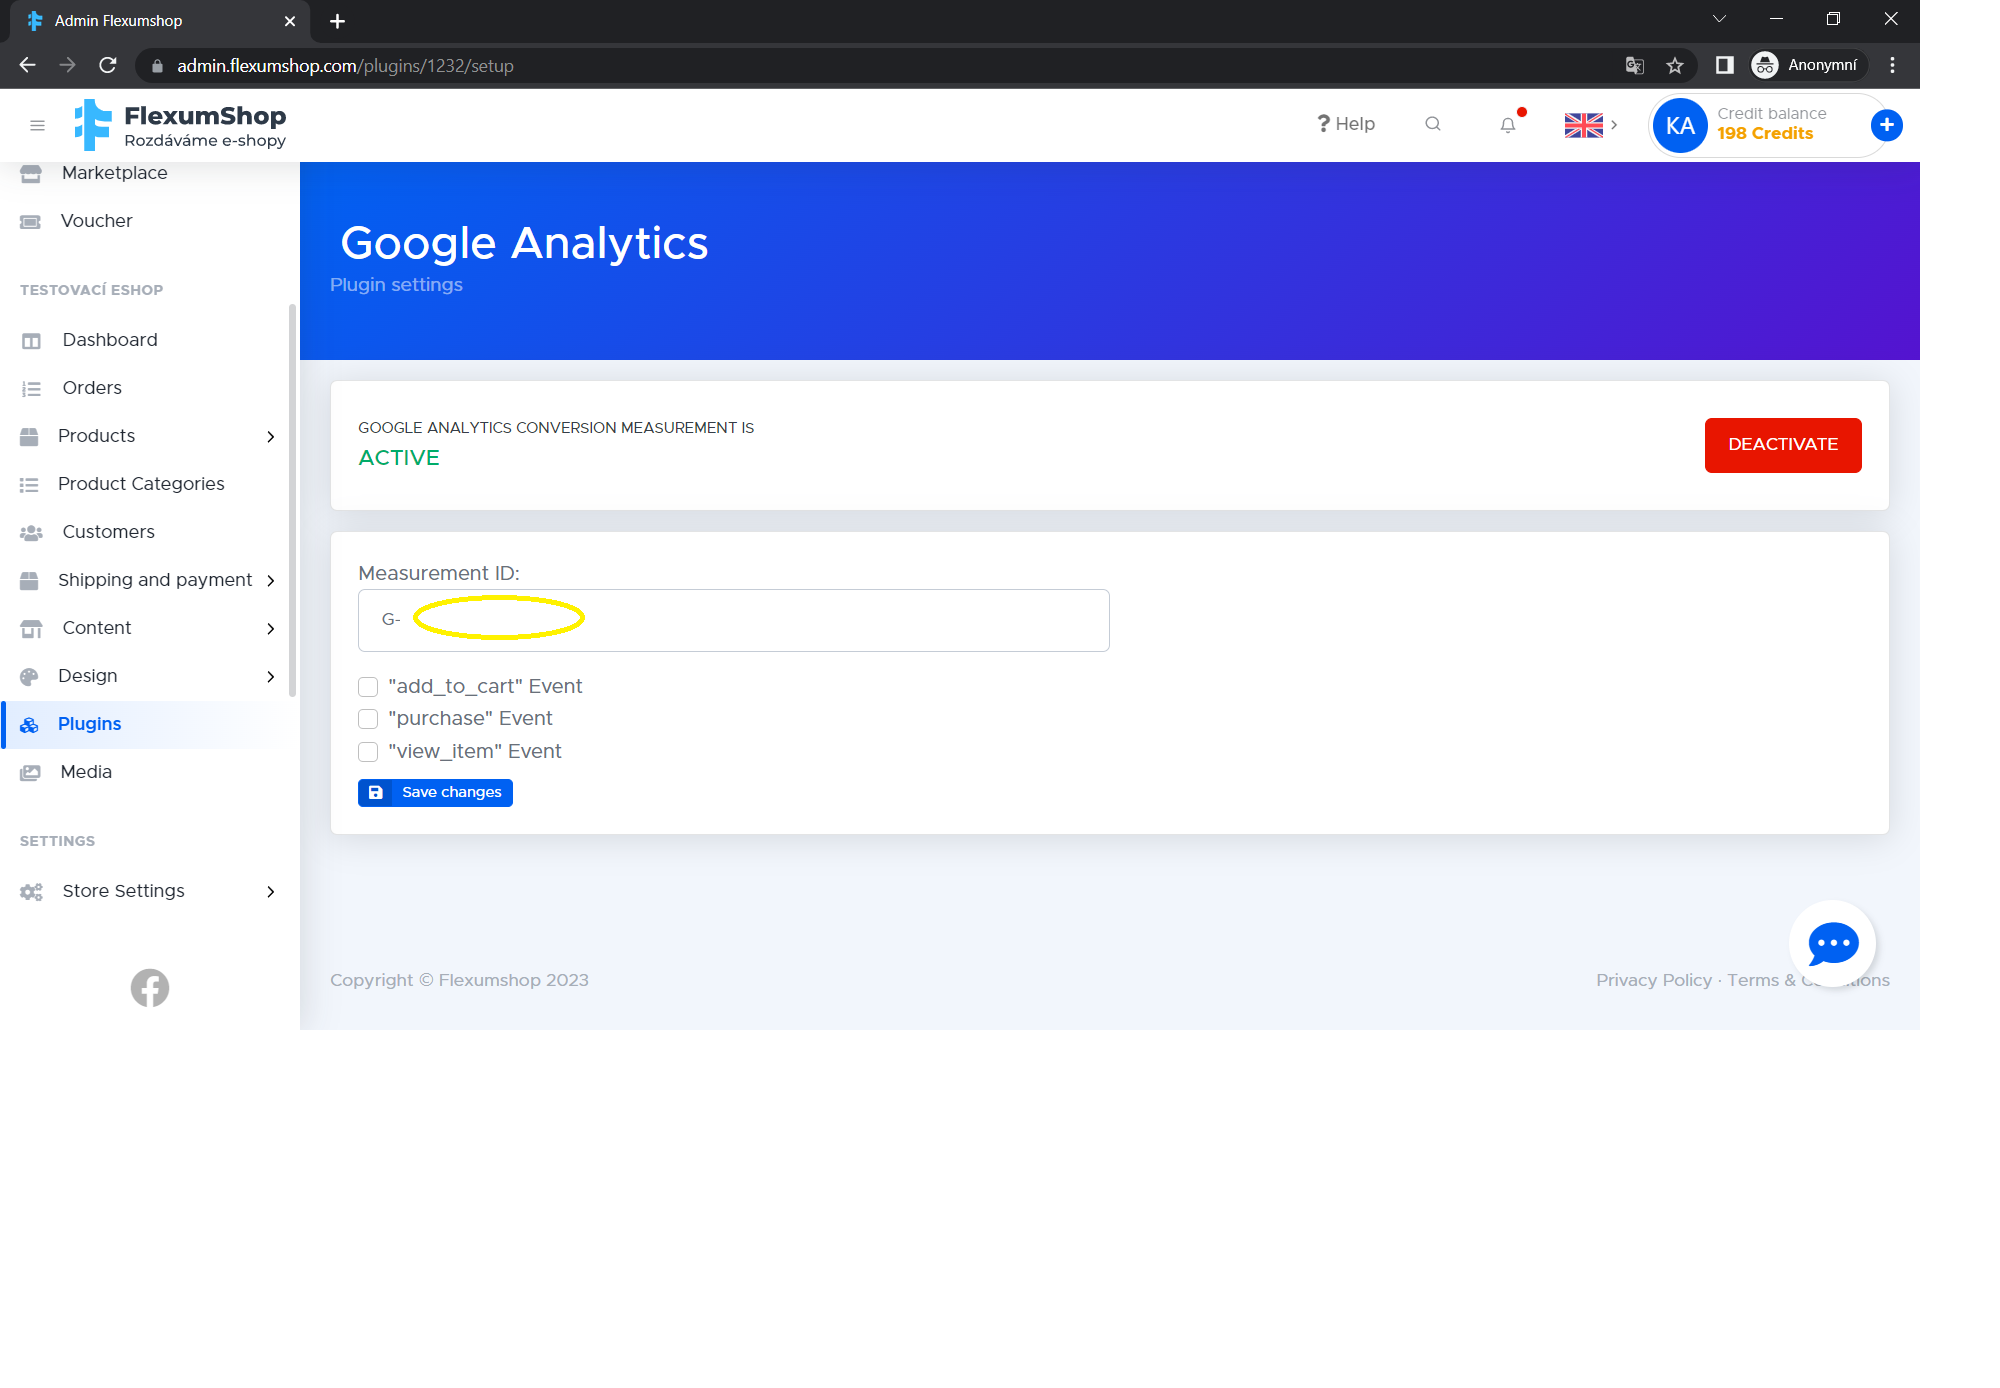
How to integrate Google Analytics 4 into your Flexumshop.com e-shop administration
On this page, click on "Install" (if you have more than one e-shop, choose which one you want to install the add-on in).
You will then see the option "Google Analytics" in the "Add-ons" (Doplňky) section of the e-shop administration.
When setting up the add-on, you need to enter the Google Analytics code into the e-shop administration and define what it should measure.
Add items to cart "add_to_cart", completed orders "purchase", view product = "view_item" and don't forget to save your changes.

Microdata
$ 4.00 / month 100 Credits / month 1 day FREE trial
They make it easier for search engines and web browsers to better understand what information is contained on a website/e-shop. In order to make it easier for search engines to display the content of your e-shop to users, they need to understand which information on the website is related to, for example, the product name, product category, price or stock availability.
What do you get by installing the "Microdata" add-on?
- You will ensure that the information is passed on to search engines so that they can correctly understand the data entered in your e-shop

Stripe
$ 4.00 / month 100 Credits / month 1 day FREE trial
A payment solution that allows you to accept credit card payments at your e-shop. The advantage of placing a Stripe payment solution is the fast free account setup and activation, which is almost instantaneous. There is no need to fill out any lengthy applications or forms. An advantage of this system is the "Radar" service, which is also already available in the Czech Republic. This service can predict a possible fraudulent transaction attempt before the payment is finalised. It can block and flag such a payment and prevent the user from proceeding, saving not only the chargeback fees but also the subsequent complications. If you are interested in information about the Stripe gateway, you can register with Stripe and by downloading the admin add-on, you can set up the information that Stripe provides and offer this gateway to your customers.
How to connect?
- You go to https://dashboard.stripe.com/register .
- You will enter your email, first and last name, select your country and set a password and agree to the terms and conditions.
- Once your account has been created, a confirmation link will be sent to your registration email. Do not forget to click on it.
- Completing the registration will take you to the Stripe administration, where you should start with the Activate your Stripe account option and be sure to fill out the basic store information. Here you need to fill out basic information about the store such as the address of the business location, billing information, industry, your account and more. Finally, you need to save everything and wait for your account approval. However, it doesn't take long to get approved, about 30 minutes.
- Once the account gets approved you go to the Developers folder and click on the API keys link. There are two API keys: Publishable key and Secret key. We will need these. Here you have the option to generate test API keys and then the keys for live use.
- Once you have the keys you go to the link https://marketplace.flexumshop.com/en/plugin/stripe. You will install the add-on.
- Then you open the e-shop administration in Flexumshop under Add-ons - Stripe.
- Click on the Settings box and enter the information you have tracked in Stripe into the boxes see screen below and save your changes.
- The last step is to set up your payment gateway according to the limits you have entered in the SHIPPING AND PAYMENT - Payment Methods section. Don't forget to make a link to your Stripe payment method in the administration in the section SHIPPING AND PAYMENT - SHIPPING METHOD.

The Pay
$ 4.00 / month 100 Credits / month 1 day FREE trial
Online payment gateway without paperwork and with the possibility to use it already on the day. A solution that just works. Is it possible to pay in different currencies? Yes, after installing the add-on, you can define the following currencies: CZK, EUR, USD, GBP, HUF, PLN, RON, BGN and HRK for your e-shop. The payment gateway follows trends and developments, so it is not a player that is lagging behind here either.
What do you get by installing "The Pay" add-on?
Connects your e-shop to Flexumshop with The Pay payment gateway
you will be excited about the automatic registration, because you can use the payment gateway the same day
offer a payment method for your customers through which they can pay for products/services in your e-shop
one of the most used payment gateways on the Czech market
you as a seller can check the payment made by the customer almost immediately after the payment is made (within a few seconds the information about the payment is displayed)
possibility of payments via link
Czech support for The Pay - by phone and email
the advantage of this payment method is that you can have, for example, CZK as the main currency and in case the money arrives in another currency, it will be converted according to the current exchange rate
If you are interested in the payment gateway, all you need to do is simply register automatically with The Pay, install the add-on and activate it + enter the information received from The Pay and save your changes. It's that simple.

Superfaktura
$ 4.00 / month 100 Credits / month 1 day FREE trial
Issue an invoice in a few clicks. You can download your invoice right away. You can add your own logo, stamp or signature. Impress your clients!
It's an effective and simple solution. Connecting to Super Invoice will be via API, but you don't have to make things that complicated because our system is prebuilt for that.
What do you get by installing the "Superinvoice" add-on?
- The add-on will allow you to connect to the online invoicing system SuperFaktura. It is sufficient to enter the data provided by SuperFaktura and save the changes.
- You can then create invoices manually.
- Set up automatic invoicing.
- Possibility to download the invoice in the customer section of the e-shop.
- Send the invoice to the customer via email.
So if you like this add-on there is no barrier to install this Super Invoice add-on.

Price history
$ 4.00 / month 100 Credits / month 1 day FREE trial
Do you know how to let customers know if the discount is real?
The thing is that sometimes retailers mislead their customers and try to lure them into a non-existent discount. With the handy "Price History" extension, customers can find out.
What do you get by installing the "Price History" add-on?
- The ability to show the customer a price history check of products for the last 30 days.
- Set this price history display for individual products or for all products.
- The information will be displayed next to the product with the link "View price history" and in brackets (Discount xxx).
How to install the add-on?
- On this page, click on "Install" (if you have more than one e-shop, choose which one you want to install the add-on in)
- You will then see the "Price History" option in the "Add-ons" section of the e-shop administration.
- You click on "Settings" and here you can choose two options.
a) "Price history will NEVER be displayed for a product unless otherwise set", i.e. once you set this, you can set where the price history will be displayed for specific products. For this to be the case, you need to go to the "Price History" section in the product details and activate "Show price history for this product" there and save your changes.
b) "Price history will always be displayed for the product unless otherwise set", i.e. this setting applies to all products without exception. - Choose which option is more suitable for you and don't forget to save your changes.

GoPay
For freeGoPay is a Czech payment gateway for online payments. It is one of the most used payment systems for e-shops in the Czech Republic.
GoPay offers several different payment methods, including Visa, Mastercard, Maestro, Diners Club, JCB, as well as payment from the GoPay account and mobile payments.
Other GoPay services include fast payouts and the ability to return money back to the customer's account.
Give your customers the most convenient payment experience on both desktop and mobile. Choose from many payment methods and dozens of languages.
In case you are interested in the GOPAY payment gateway, you must register and sign a contract with Gopay to provide you with the necessary data that you will enter into the add-on settings with us.
How to integrate a payment gateway into Flexumshop.com:
- On this page, click on "Install" (if you have more than one e-shop, choose which one you want to install the add-on in)
- Install the add-on
- Go to the "Add-ons" section in the administration and look for the "Gopay" add-on
- Insert the Gopay ID, Client ID and Client Secret that you will receive from Gopay after establishing a contract with you as an e-shop on FlexumShop.
- Then save the changes.
- In the same section, at the bottom define what payment methods you want to allow your customers (e.g. Payment Card, Fast Bank Transfer, Mobile Wallet, etc.)
- Go to Shipping and Payment - Payment Method.
- Select the payment type and you can edit the payment description, tax and if you want to charge a fee or other conditions, for example in case of other currencies.
- Finally, don't forget to link shipping and payment in the Shipping and Payment - Shipping Method section in the details of the specific shipments within the given limits.
- The Gopay payment gateway is now set up and functional.

Számlázz.hu
$ 4.00 / month 100 Credits / month 1 day FREE trial
Quick and simple invoicing. A secure and easily integrable automatic invoicing system with unlimited invoice issuance. Számlázz.hu is connected to NAV - National Tax and Customs Administration - and meets all current and upcoming requirements. Számlázz.hu is the most widespread online invoicing service in Hungary.
What do you get by installing the Számlázz.hu add-on?
Szamlazz.hu is a simple and versatile online invoicing system. With this add-on is easy to integrate Számlázz.hu in your FlexumShop store. This makes invoicing in Hungary easy and automatic. After you installed Számlázz.hu plugin, you dont have to copy and paste orders from you shop to another online invoicing system, you dont have to care about NAV or send the invoices one-by-one to your clients. This plugin will do all of it with a single click. On the dashboard of Számlázz.hu you can track and manage all your invoices. Számlázz.hu is dealing with the legal requirements and connected to NAV.
Additionally you can personalize your invoices and use your brand identity on them.
Installation procedure
- Click on the “Install” button on this page! - If you have multiple FlexumShop online stores, choose which one you'd like to use with the Számlázz.hu online invoicing plugin in.
- Next, in your webshop's dashboard, the Számlázz.hu plugin will appear in the “Plugins” menu.
- Here, click on the “⚙️Settings” button, which will take you to the plugins’ settings page.
- If you haven't done so yet, register for a Számlázz.hu account. (You can find it’s steps below in the “Creating a Számlázz.hu invoicing account” section)
- On this page, provide the requested information, starting with the “Szamlazz API Key/Szamlazz agent key” than click Save button.
- Here, you can enable our system to automatically create e-invoices for orders.
Creating a Számlázz.hu invoicing account
- Visit the www.szamlazz.hu website!
- Click on the “Regisztráció” button. For registration, you'll need an email address or a Facebook/Google account.
- When creating your invoicing account, you can upload your company's logo - this logo will be shown in the top left corner of the invoice. Choose whether you want to invoice as a company, as an individual entrepreneur, or another organization!
- Provide the company details and then click on the “FIÓK LÉTREHOZÁSA” button!
- Create an Invoice Agent key! The owner of the invoicing account or its administrators are authorized to generate a key. After logging in, scroll down to the bottom of the user dashboard.
- On the right edge of the Invoice Agent keys section, by clicking on the key icon, you can create a new key.
- By clicking on the icon next to the key, you can quickly copy it to the clipboard and paste it into your FlexumShop.

Backup
$ 15.84 / month 396 Credits / month 1 day FREE trial
A reliable partner for protecting and restoring your e-shop data. With a simple and user-friendly interface, it allows you to manually backup your important information to avoid unexpected data loss. The add-on gives you full control over the backup process so you can protect your e-shop exactly as you need.
If necessary, you can easily restore your backed-up data and restore your e-shop back to its original state before data loss or unwanted modification. You can restore product categories, product groups, tax levels, product parameters and their values.
Purchase the add-on and get peace of mind knowing that your valuable information is safely stored and easily accessible when needed.

Árukereső.hu
$ 4.00 / month 100 Credits / month 1 day FREE trial
With this plugin, you can list your products on the Árukereső price comparison platform, thereby increasing the visibility and sales potential of your FlexumShop webshop. The plugin allows you to easily and automatically synchronize your products with Árukereső.hu, granting you access to its massive visitor base.
Árukereső is one of Hungary's largest and most popular price comparison websites. On the site, users not only can find information, prices, and reviews on various products, aiding them in their purchasing decisions, but with Árukereső Shopping they can directly purchase your products.
What benefits do you get with the Árukereső.hu plugin?
This add-on is an easy-to-use tool that can elevate the visibility of your webshop and your product sales. With the Árukereső plugin, you can effortlessly integrate your webshop's product list with Árukereső.hu. This plugin allows you to automate product updates, ensuring that the most recent information is always displayed on the price comparison site. Additionally, you can track sales and visitor statistics on the Árukereső.hu interface.
How will your FlexumShop webshop function with Árukereső.hu?
After the installation of the Árukereső.hu module, you only need to decide if you want to enable purchases via the Árukereső Shopping service. With a single click, you can generate your product feed, which can be transferred to Árukereső. From that point on, synchronization with Árukereső.hu will occur automatically. Your products will be continuously updated on Árukereső.hu, ensuring you always offer the most current information to prospective customers.
Installation steps in FlexumShop:
- Click on the “Install” button on this page! - If you own multiple FlexumShop stores, choose which one you'd like to utilize the Árukereső.hu integration in.
- On your webshop's admin page, the Árukereső.hu plugin will appear under the “Plugins” menu.
- Click on the “⚙️Settings” button to navigate to the plugin's settings.
- Specify the parameter that indicates the product's manufacturer.
- Indicate if you wish to use the Árukereső Shopping service.
- You can set which categories the product feed should exclude, then click the Save button.
- Afterward, simply click the Generate button to get your products feed.
- You can download and use the product feed on the Árukereső platform.

Shipping limits
$ 4.00 / month 100 Credits / month 1 day FREE trial
With this add-on, you gain full control over setting shipping conditions in your online store. This powerful tool allows you to optimize costs and improve the customer experience with the following features:
Main Features:
- Price and weight limits: Set price and weight limits for individual carriers. Combine both types of limits or use them separately according to your needs.
- Geographical restrictions: Determine which shipping options are available for different countries. For example, you can allow PPL shipping only within the Czech Republic and set different conditions for foreign markets.
- Specific conditions for different countries: Customize shipping prices and other conditions for individual markets. For instance, you can set different shipping rates for different countries, allowing you to better manage costs and offer customers exactly what they need.
Why choose Shipping limits?
- Cost optimization: Save on shipping costs by setting specific limits and conditions for individual carriers and countries.
- Improved customer experience: Provide customers with clear information about available shipping options and their conditions, increasing trust and satisfaction.
- Flexibility and customization: With a wide range of settings, you can tailor shipping precisely to the needs of your online store and the market you operate in.
How does it work?
- Setting limits: Easily set price and weight limits for individual carriers in your online store's admin panel. Flexibly combine limits or use them separately as needed.
- Geographical customization: Choose which shipping options will be available for different countries and set specific conditions for each country.

Discount coupons
$ 4.00 / month 100 Credits / month 1 day FREE trial
Discount coupons bring a wide range of options for creating and managing discount promotions on your e-shop. This plugin allows you to set up different types of discounts, which can be either a percentage (e.g. 10% discount) or set to a fixed amount (e.g. €10 discount).
You can customize the coupons to the needs of your e-shop - you can choose your own coupon text or have a unique code randomly generated. You also have the option to decide whether the coupon will be usable once, for example as a gift for a new customer, or whether the coupon will be reusable, which can be ideal for long-term promotions.
The Discount Coupons plugin offers flexible validity settings - you can define the period during which the coupon will be active, for example, from a specific date to a specific date, allowing you to better plan time-limited promotions such as seasonal sales or special promotions for major events.
Another advantage is the ability to set a minimum order value from which the coupon will be valid. This is useful for motivating customers to make larger purchases, for example by offering a discount on purchases over €100.
In addition, coupons can be limited to certain products or categories. If you want the discount not to apply to specific products, you can mark them with a special label that will automatically exclude those products from using the coupon.
This feature is a great tool for driving sales, increasing customer loyalty and tailoring discount promotions to the specific needs of your business. Coupons allow you to easily and efficiently manage your marketing campaigns and maximize their impact.

Age restriction on purchase
$ 4.00 / month 100 Credits / month 1 day FREE trial
The Age Restriction Plugin allows you to add an age verification prompt to your e-shop. This add-on ensures that every visitor sees a pop-up window with the following message: "To view the page, please confirm that you meet the age limit of 18."
In order for a customer to access your site, they must click to confirm that they meet the age limit. The text in this pop-up is fully customisable so you can adjust it to suit your needs.

Unit of Measure
$ 4.00 / month 100 Credits / month 1 day FREE trial
The Unit of Measure plugin, will allow you to better present the prices of your products. This feature is ideal for products sold in different volumes or weights, such as alcohol, food or drugstore. After installing the add-on, you can set the price for each product or its variant in the "Unit of measure" tab for a specific unit of measure, such as price per liter, kilogram or other unit you define.
For example, if you sell alcohol in 0.5 litre bottles, you can also specify a price per litre for the product. This makes it easy for customers to compare different pack sizes and have a clear view of prices. This feature increases transparency and convenience in the shopping experience, which can positively influence customer decision-making.


